Showing posts with label DIY. Show all posts

Wednesday, August 8, 2012

Birdy Baby Shower: Hatching Soon!


I was honored to surprise one of my oldest and dearest friends with a birdy-themed baby shower.  
With the help of my Sister (she was the lovely designer for all the printables) we made themed cupcake-toppers (Hatching soon, Sweet Tweets and Thanks for being so TWEET), a birdy clothing line for the guests to pin up some trusted advice and tips, we had a photo-booth, and had special mocktails to sip on: Mamarita's and Lullaby Lemonade. The Sweet Tweets table was an absolute hit. I had so much fun planning this special day!

And now, I am proud to announce that the little birdy finally hatched... Healthy and GORGEOUS...just like her mommy:)

Wednesday, July 20, 2011

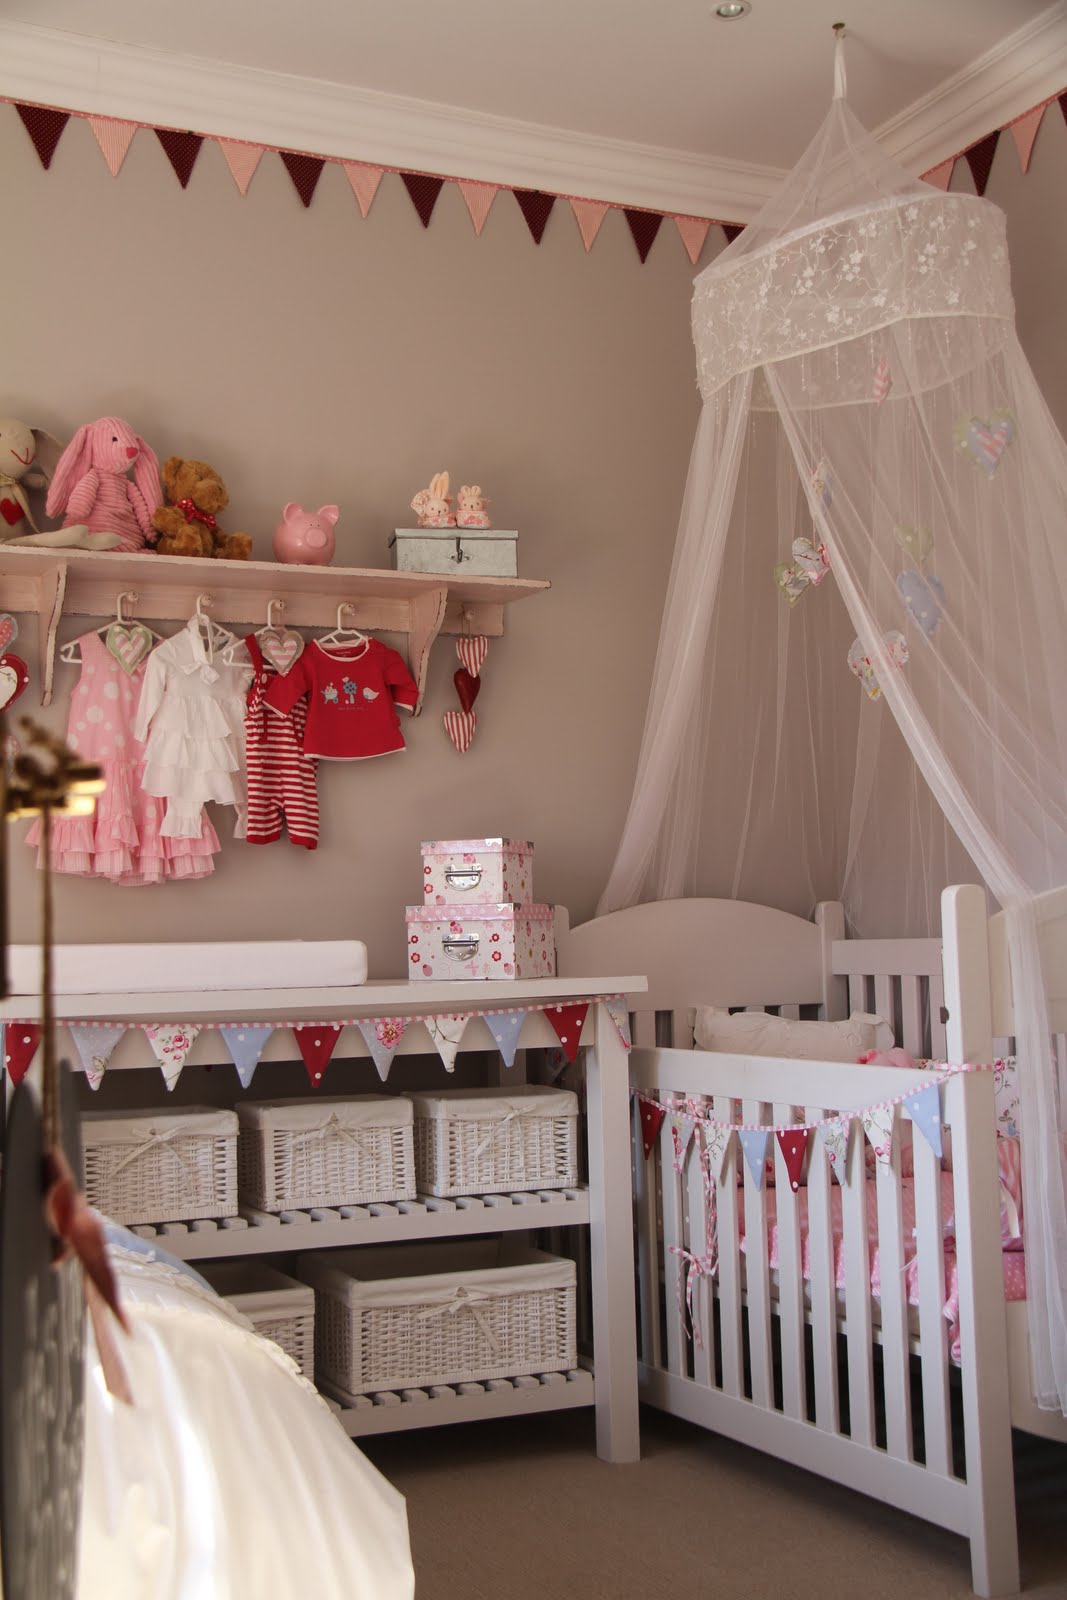
Our Baby Girl Mia's DIY Nursery


So the many hours of work has finally paid off. Our little baby girl Mia (due in only 7 weeks!) finally has her own perfect little room.  We had so much fun preparing every little detail and put hours of thought and consideration into every aspect of it.

I wanted a palette of Pink, Vintage Red and Powder blue... and I think we got it right! 

Of course I couldn't do all of this by myself, and had lots of hands helping to complete this lovely nursery.  A big thanks goes out to my Godmother and Aunt Susaar who came with her suitcases and sewing machine and spent so many hours sewing together all the little pieces.  

I wanted flags and hearts and lots of it! I didn't like any of the designs and colour schemes I saw in the shops, and I was even disappointed at the prices of Cots and Compactums.  I therefore decided to embark on this wonderful DIY journey of creating our little girl's nursery exactly how I envisioned it. 

Here's what we did:
  • Sourced raw pine cot and work bench and painted it off white (Potters Clay from Dulux)
  • Painted the walls a nice neutral colour (Chalk Blush from Dulux) so that it will fit in with any colour scheme.
  • Hand picked selected fabrics (Hertex Fabric) and made quilt, flags, hearts and cot bumper.
  • Refurbished an old bookcase and painted it white, then decorated it with the same flags to match with the room.
  • Used ready made curtains that we "spruced" up with fabric and ribbons to fit colour scheme.
  • Used gifts (stuffed animals), vintage pieces (The red chair was Ryan's grandmother's and the Christening dress was my own) and some of Mia's cutest outfits to help decorate the room and make it more cozy
  • Borrowed a cot net from my husband's Aunt, saved big bucks not having to buy one ourselves
  • Put lots and lots of hard work, love and soul into this project...and that was the most important "ingredient" of all!




Saturday, December 18, 2010

Christmas Table Settings

I love these beautiful and different Christmas table ideas I found on Home Life!


Lovely Vintage Table


Elegent Chinoiserie Table


Red and White Table


To get the how-to on these lovely settings, click here

Monday, December 13, 2010

Edible Christmas Gift Ideas

I loved these wonderful easy-to-make edible Christmas gift ideas I found on Homelife.
Treat someone to some handmade Toasted Muesli in adorable stamped brown paper packages.


Chocolate truffles make a decadent gift that not many could resist. For a beautiful finishing touch, package them in some vintage tins lined with pretty paper or hand-cut baking paper.


Jar up some delicious mixed berry jam.


Whip up some handmade gingerbread people.

For more information and recipes click here.

Friday, December 3, 2010

Get Chatty With Chalkboards!

I spy chalkboards almost everywhere...and I LOVE IT!  Just look at all the different ways you can express yourself by adding some blackboard paint to a wall, door, cabinet, or even in a frame and viola, you got yourself a piece of art.  It makes leaving a note just so much more fun! So go on, get chatty with chalkboards!


Sources: